SFTP with AWS Transfer Family – How to
Per Wikipedia, the SSH File Transfer Protocol (also known as Secure File Transfer Protocol or SFTP) is a network protocol that provides file access, file transfer, and file management over any reliable data stream. There are a lot of benefits to using The AWS Transfer Family for a SFTP server.
Below are directions for setting up the SFTP using the AWS Transfer Family
1. Sign in to the AWS Management Console
- Go to the AWS Transfer Family console at https://console.aws.amazon.com/transfer/.
2. Create an SFTP on AWS server
- Click the “Create server” button.

(You may need to click on the “Servers” tab in the left navigation pane.)
- Enter a name for your server.
- Select the protocol as “SFTP – SSH File Transfer Protocol”.

- Choose the identity provider for user authentication. You can choose AWS Directory Service, an IAM role, or a custom identity provider (such as Microsoft Active Directory).
- For the quickest, most straightforward approach, we’re building a standalone SFPT server so we will use the “Service managed” option.

- We want this to be accessible online, so choose “Publicly accessible.” Later, you may create a friendly CNAME for the server endpoint hostname and update it to a custom hostname if necessary.

- Chose the Storage to be S3.

- Set logging settings.

- Keep other Defaults and Click Next.

- Review and click the “Create server” button at the bottom.
3. Create IAM Role for users
- In the IAM management console, choose Roles, then Create Role.

- Keep “AWS Service” as the “Trusted entity type.”
- Choose “Transfer” as the Service or use case.

- Click Next and Search for “S3” under Permission Policies.
- Select AmazonS3FullAccess to allow Write and Read Access.
- Later, you may want to make another role with just AmazonS3ReadOnlyAccess

- Click Next
- Name the Role
- Note the Trust Policy allows the Transfer Service to assume the role to access S3.
- Click Create role.

4. Create S3 Bucket:
- Go to S3 in the console and create the bucket <<bucketname>>.

- Create a folder for your SPTP content.
- Optionally, Update S3 resource-based policy. Under the Permissions tab for the bucket, scroll down to “Bucket policy” and limit the bucket to the ARN of the Role you created. This is an extra layer of protection for the bucket.
{
    "Version": "2012-10-17",
    "Statement": [
        {
            "Effect": "Allow",
            "Principal": {
                "AWS": "arn:aws:iam::<<insert arn of buckename>>"
            },
            "Action": "s3:*",
            "Resource": [
                "arn:aws:s3:::<<bucketname>>",
                "arn:aws:s3::: <<bucketname>>"/*"
            ]
        }
    ]
}
5. Create SSH Keys
- On a Mac or Linux: In the terminal run the following command replacing “keyname” with a name of your choice <
>: - ssh-keygen -P ” -f <<keyname>>-key
- This will create 2 files (public and private key)
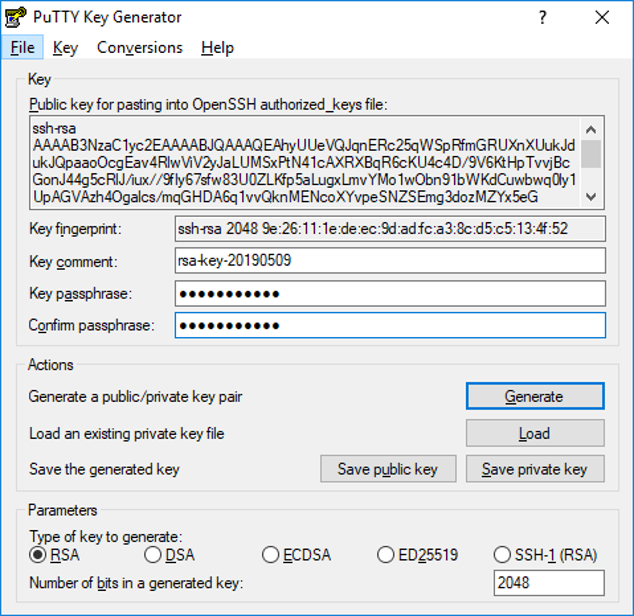
- On Windows use Putty to generate the key pair.

- The Public Key will be used when creating the user. The Private key will be sent securely to the user.
6. Add Users
- Select the server you made earlier in the AWS console for Transfer Family.
- Choose Add User

- Choose the options below with the correct bucket name and folder.
- Create a username, Choose the Role you made earlier, and in Home Directory, choose the Bucket and Folder you made. Check “Restricted.”

- From the Public Key file, cut and paste the key.
- Then click “Add.”

7. Testing: Connect to the SFTP server
- Use an SFTP client such as FileZilla, WinSCP, or Cyberduck.
- Enter the server endpoint URL found on your Transfer Family server information page.

- Enter your username and point to SSH private key.
- Sample from Cyberduck:

- Connect to the server using SFTP protocol (port 22).
8. Upload and manage files
- Once connected, you can upload, download, and manage files on the server using your SFTP client.
Need Help?

Tech Reformers helps organizations manage and optimize their AWS environment.
Tech Reformers Chat
Open Tech Reformers Chat